
In this sectionGetting started8 articles
Set up Koarge: signup to first sale
The full setup, in order, from creating your account to taking your first live payment.
Where you'll be working
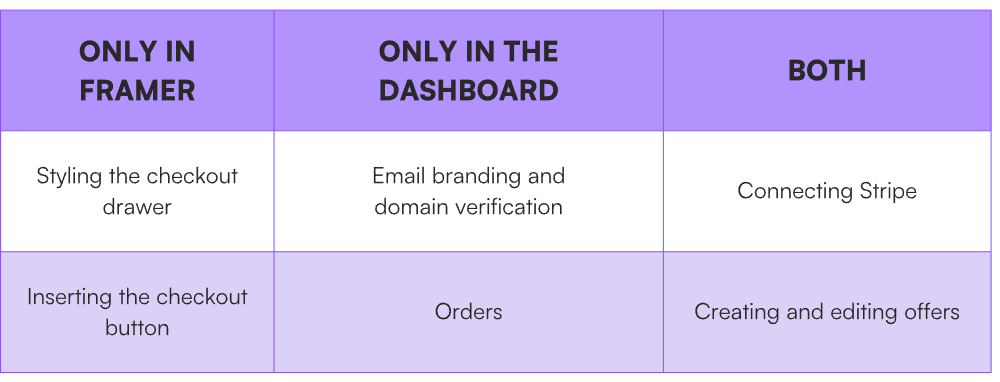
Setup happens in two places: your Seller Dashboard and the Koarge plugin panel inside Framer. Most things sync between them, but a few only exist in one place:
1. Subscribe and set your password
After you subscribe, you'll get an email with your license key (it starts with KRG-) and a link to set your password. That link is good for 24 hours. Set your password and sign in to your Seller Dashboard.
2. Install the plugin and activate your license
Install the Koarge plugin in Framer, open it in the project you want to sell from, and enter your license key. One license covers one Framer site.
3. Connect Stripe
From Setup → Stripe, in either the Dashboard or the plugin, connect your Stripe account. If you don't have one, Stripe walks you through creating it.
Nothing works until this is done. You can create offers, but you can't make them active — they'll save as archived.
4. Create your first offer
From Offers, in either place, create an offer and set it active.
Choose Digital if you're delivering a file, Service if you're not. Add a name, description, and image, then set your price. Your currency is set at account level by Stripe, based on your account's country — it's the currency your payouts arrive in.
For digital offers: upload your file and wait for the scan to finish. Accepted file types are listed under the upload box. You can also set a download limit and a link expiry period — both are there as a protective measure for your file.
For service offers: there's nothing to send. When someone buys, Koarge takes the payment into your Stripe account, emails the buyer their receipt, and adds the order to your Orders page. Getting in touch and doing the work is up to you — use the description to set expectations.
5. Style your checkout drawer
Only in the Framer plugin, under Checkout. Skip this if the default looks fine.
You set light mode colours only. On a dark site, the drawer adapts to readable contrast on its own.
Colours: drawer background (solid or gradient), headings, body, muted text, the discount tag, and the pay button. The discount tag only appears if you've set a compare-at price on the offer.
Typography: type any Google Font name — Poppins, Playfair Display, whatever you use on your site — and it loads automatically. Leave it empty for the defaults, Raleway for headings and Inter for body.
Thank-you screen: edit the heading and message. The defaults are "Thank you!" and "Your payment was successful. We've saved your order details below."
Contact link: optional. Add a URL and your thank-you screen footer shows "Contact the seller" pointing at it. Leave it empty and that link opens an email to you instead, using your account email — or whichever support address you set under Setup → Emails.
Save your theme when you're done.
6. Add your checkout button and publish
Only in the Framer plugin, under Button. Insert the button onto your canvas, then style it freely like any other Framer element.
Each button is tied to one specific offer — check Selected offer in the Button tab before inserting. If you're selling three things, you need three buttons.
Then publish your Framer site. This step gets missed constantly. An unpublished site means your buyers can't reach checkout, no matter how correct everything else is.
7. Brand your emails
Only in the Dashboard, under Setup → Emails. Optional, but worth doing before you sell.
Verify your domain and your emails send from your own address instead of a Koarge one — receipts@yourdomain.com. Then set your logo, business name (this appears in the subject line, as "Your receipt from business name"), sender name, support email, reply-to address, email colour, button colours, and corner styling.
Your business name defaults to the one you gave when you subscribed.
The plugin has a Receipt tab, but it only previews the email and sends yourself a test. Branding is Dashboard-only.
8. Take a test payment
You start in test mode by default, so you can buy your own offer before anything is real.
Pay with the Stripe test card 4242 4242 4242 4242, any future expiry date, and any 3-digit CVC. Then check: the order appears in the test tab of your Dashboard (orders are Dashboard-only), the receipt arrives, and for digital offers the download link works.
9. Go live
Switch to live mode. Take one real payment yourself if you want certainty. You're selling.
If it doesn't work
Your Dashboard Overview flags anything incomplete. If checkout isn't reachable, the cause is almost always an unpublished Framer site or a disconnected Stripe account.